Skip navigation

If you’ve been anywhere near my main blog recently the front page has been looking like this for quite some time now

screenshot_skytreader

Yeah. I’m currently redesigning the website. I don’t know why. Guess it’s just that the look and feel I designed when I was just in my sophomore year in college is not me anymore. Tsk.

Anyway, this is the fourth time I’d be redesigning my main blog ever since I got my mind around blogging. I started blogging when I was in third year high school. Four versions in five/six years? Not bad, I say.

This time, I’m relinquishing controls over to WordPress. The first two “versions” of my blog were all static HTML plus some JavaScript. And it was hosted at GeoCities. The third one had some CMS/parser I wrote using Java, the result of which I’d upload using FileZilla to my own bought webspace. It was in PHP and XML—no databases. The CMS/parser was one hell of spaghetti code; it’d break at corner cases every now and then and I never got around to fix those bugs since, hey, I can live with it. Come to think of it, as I switched machines over the last few years, I’m not sure if I still have the original source codes. I only have the jar file.

But I’ve been woolgathering. My whole point here is to note what I learned with tweaking WordPress.

Where do I start?

Depends on where you want to go. Don’t want your blog posts on the front page but, instead, have some dedicated page for it, featured on your nav bar? WordPress got you covered easily. Just go to “Settings” -> “Reading”, and you should see something like this:

reading_settings
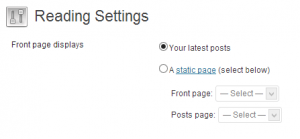
Pretty self-explanatory eh?

But what if you have already have a theme which displays your latest posts on the front page but you just want to customize it somehow? Enter, WordPress’ The Loop.

Put simply, The Loop1 is what is responsible for displaying the posts in your blog. You can invoke The Loop in many ways. What I’m using for my main site is as follows:

1
2
3
4
5
6
7
8
9
10
11
12
13
14
<?php
     $temp = $wp_query;
     $wp_query= null;
     $wp_query = new WP_Query();
     $wp_query->query('posts_per_page=5'.'&amp;paged='.$paged);
        if($wp_query->have_posts()):
            while ($wp_query->have_posts()) :
                $wp_query->the_post();
?>
...
<?php
             endwhile;
         endif;
?>

Again, pretty self-explanatory. Note that this uses PHP’s templating syntax: you can write HTML in the position of those elipsis and they’d be written at every iteration of the loop, if they apply. Also note that I could have used the more-common “curly brace” syntax when writing loops and conditionals but, for templating, it makes more sense to ditch this tradition and go ending blocks with the end syntax as this makes it cleaner to distinguish which block you are ending.

So, what can go inside the loop?

This is where you’d typically print out your blog posts. WordPress provides a host of the_* functions for you to access the parts of your post. All their names are very self-explanatory. Of note are:

Putting it all together

If you want your theme to display your posts on the front page, you’d have to put The Loop in some file like “home.php” or “index.php” found at the wp-content/themes/themename of your WordPress installation. So, say you want a basic list of recent posts that show the title (which links to the posts “solo” or “permanent” page), author name, and the contents, you’d end up with something like this inside The Loop:

1
2
3
4
5
<h1><a href=<?php echo '"'; the_permalink(); echo '"'; ?>>
    <?php the_title(); ?>
</a></h1>
<?php the_author(); ?> <br />
<?php the_contents(); ?>

But wait! I’ve too many posts!
This is the time you handle pagination in your blog. To display the “pagination links” (as I call them), you have plenty of options (which are, again, very self-explanatory):

Note that WordPress is smart enough not to display a pagination link if it does not apply (i.e., if no posts are newer/older).

404 Trouble

When you click on your pagination links, it may happen that you get a 404 (Not found) message. This is easily fixed.

At line 5 of my The Loop code listing above, I indicated the number of posts I want per page. This value should be equal to what is set in your WordPress settings. At Settings -> Reading, see the value “Blog pages show at most”.

Is that all?

By now, this should be good to deviate a bit from the themes you get. You can do more by tweaking the CSS of your theme though if you had to use someone else’s theme I wouldn’t advice intensive CSS tweaking (you’re probably no designer). But well, whatever floats your boat.

  1. Can’t help it but WordPress’ terminology reminds me of another “The Loop” in my geek life: The Game Loop. But that is for another time entirely. []

I’ve been planning to get a new laptop for quite some time now, maybe at around December. However, certain miscalculations and one heartbreaking failure from the charger of my previous one means that I’m now typing this on a new machine, bought pretty way earlier than expected. And, like all good (or semi-good, depending on your loyalties) geeks do, I set-up the machine to dual-boot Windows 8 (pre-packaged with the hardware) and Linux the first time I had the opportunity (i.e., this long weekend).

It was hell.

Almost like this. Thankfully, only took me 1.5 days.

It seems that my hardships are all courtesy of UEFI/Secure Boot. Maybe there exists an easy way to achieve what I wanted but, judging by the volume of unresolved posts related to my problem scattered on the internet, it is not an obvious way. To anyone who might come across the same problems as me, here’s the complete narrative of how I managed to dual boot my machine.

0 Prologue

I dual-booted on an Acer Aspire-471G laptop. The OSes I want side-by-side is Windows 8 and Ubuntu 12.04 (Precise Pangolin). Since we’re dealing with the BIOS, I think it’s just proper that we get my machine on the record. If you run these steps on another machine, there might be some differences along the way.

Also, it seems that UEFI (and related dual-boot problems) has been around since Windows 7. However, I have never tried dual-booting a Windows 7 machine with Ubuntu—my experiences were all with XP and Vista, and it was all easy. And yes, I also encountered some 7-specific questions along the way.

1 Make sure that your LiveCD is 64-bit

There is no such thing as 32-bit UEFI. You will not be able to boot your machine in UEFI mode from your LiveCD if your LiveCD is  32-bit. While UEFI has support for legacy BIOS (and, from legacy BIOS, allow you to boot from a 32-bit LiveCD) this will result to a rather awkward and possibly-dangerous dual-boot set-up: you’d need to switch your BIOS mode from UEFI to legacy and back, depending on the OS you want to load.

(Blooper disclosure: I almost bricked my BIOS trying to boot from a 32-bit installer in UEFI mode: I ended up installing rEFInd through Windows and renaming stuff from my EFI System Partition, and got all sorts of weird and horrifying errors. The thing is, I just got the installer from one of our sysads at work and have used it previously to dual-boot an old 64-bit machine running XP. I’m glad I realized my mistake early.)

How do you determine then the bitness of your LiveCD installer?

At the root of your LiveCD, there is a file named README.diskdefines. Open that file (right-click->Open with->Notepad, or any other plain text editor). If you are looking at a 32-bit installer, that file will read like this (notice the ARCH variables):

#define DISKNAME  Ubuntu 12.04 LTS "Precise Pangolin" - Release i386
#define TYPE  binary
#define TYPEbinary  1
#define ARCH  i386
#define ARCHi386  1
#define DISKNUM  1
#define DISKNUM1  1
#define TOTALNUM  0
#define TOTALNUM0  1

On the other hand, if on a 64-bit installer, you’ll get:

#define DISKNAME  Ubuntu 12.04.1 LTS "Precise Pangolin" - Release amd64
#define TYPE  binary
#define TYPEbinary  1
#define ARCH  amd64
#define ARCHamd64  1
#define DISKNUM  1
#define DISKNUM1  1
#define TOTALNUM  0
#define TOTALNUM0  1

Also, the 64-bit version will have a directory named “efi” at the root. If you are seeing a 64-bit README.diskdefines and no “efi” directory, there is something wrong with your installer.

2 Get comfortable tweaking your BIOS

Warning: This can be dangerous! Proceed with a well-rested mind.

As you may have guessed earlier, there will be a lot of BIOS dealings involved here. To get to the BIOS set-up, press F2 while your machine boots.1

You need to be comfortable with two things: changing your boot order and adding .efis to the white list (“trusted”) of your machine. The first one is pretty basic but the second one has bit more technical details involved.

(For the first one, aside from being pretty basic, it is oftentimes unnecessary. You just need to make sure that your computer considers the HDD/Windows bootloader later than your optical drive and USB drive for bootable media. This is often the case. ACER ASPIRE-471G USERS, I must note that I was a bit surprised to find out that on this machine, this is not the case.)

White listing .efis involves setting a password and navigating your EFI System Partition (ESP) as well as other possibly-bootable media (like your LiveCD). Just remember two things here:

  • If you mess-up your system and suddenly can’t boot Windows, the .efis which Windows uses are at EFI/Microsoft/Boot and EFI/Boot, not case-sensitive, AFAIK. Might be worthwhile re-white listing the .efis inside these two.
  • If, after setting your boot order, you still can’t boot from your LiveCD installer, you need to white list the LiveCD efi, efi/boot/bootx64.efi

3 Installing Ubuntu

(I’ll be linking this part mostly.)

Now we get to the fun part. If your circumstances are anywhere like mine, you might need to partition your drive first. While you can partition your drive from the Ubuntu installer, in the interest of dual-booting, I recommend that you partition from Windows beforehand2. Here’s how.

Finally, you can proceed with installing Ubuntu. This tutorial pretty much says it all.

Note that the linked tutorial uses an older version of Ubuntu (11.10) which may or may not have caused the existence of the next section of this post which is…

4 PROBLEM!

After successfully installing Ubuntu, I rebooted. Sure the boot-up screen looked a bit different (there was a Unix-y underscore cursor present) but it still loaded directly to Windows 8!

I tried white listing the new EFI/ubuntu/grubx64.efi found in my ESP. However, that resulted to Ubuntu loading directly without even a shadow of GRUB showing up.

I then used the boot-repair utility and got these results. I had to re-white list EFI/ubuntu/grubx64.efi. Indeed, GRUB now shows up but without any option to boot Windows 8.

At this point, it’s been close to 1.5 days since I embarked on this task. I’m glad that xkcd got most of this stuff documented. And I’m also glad that, though I went beyond the 24-hour mark, nothing became a lost cause.

Besides, I’m not a very good swimmer!

In a moment of almost-frustrated defeat, I found zen from an earlier episode in this adventure. It dawned on me: just install rEFInd.

(Yep, my boot-up is now managed by rEFInd. Far from a perfect solution, in my opinion but it does what I wanted it to do. So long for now!)

  1. That’s on this Acer machine. If F2 does not work on yours, other candidates might be F10 and F8. []
  2. In my case, the Ubuntu installer didn’t detect another OS in my machine, didn’t detect Windows 8. I don’t know what would’ve happened if I made a wrong move while partitioning from the Ubuntu installer in this case. Hence, not recommended. []

(You’ll find lots of this online. I’m just putting this up here for my personal reference.)

Hi there. I’m writing this with a Linux/Unix/OS X environment in mind. Basically, any OS that has a pretty powerful terminal. Don’t know how this goes for Windows…Cygwin maybe?

First off, make a virtualenv to work on and install Django. You need virtualenv and virtualenvwrapper. If you do not have them installed yet, do not despair. You can use virtualenv-burrito (and I do recommend that you use virtualenv-burrito). The readme of the GitHub repo linked is pretty self-explanatory so I won’t dwell much on that. I’ll just say that…

…if, after following the instructions for virtualenv-burrito, you still can’t invoke virtualenv commands, you might have to do

$ source /home/username/.venvburrito/startup.sh

Or, better yet, just put that line in your .bashrc file (or equivalent).

And also, if you are a Python 3.x fan, Django does not work yet with Python 3.x .

So, make and work on a virtualenv by

$ mkvirtualenv env_name
$ workon env_name

While inside a virtualenv, install Django (note that, being in a virtualenv, you need to be in a virtualenv to use Django):

(env_name)$ pip install Django

Create new projects by invoking

(env_name)$ django_admin.py startproject project_name

This will create a directory named project_name . This directory has some Django-related files. Go to this directory. Start the server by

(env_name)$ python manage.py runserver

And your set to create your web apps!

I’ve heard of Django long ago but what really got me started with it is PyCon Philippines. Here are Daniel Greenfeld’s notes on the PyconPH Django talk by Marconi Moreto, which was my primary reference in setting up my Django installation. However, I had a few deviations and personal discoveries, hence this blog post.

Ok. Not really magic and I bet other people got this figured out and it’s just me because I’m not following standards. Anyway…

My portfolio website was the first time I ever did table-less layout. So, it was also the first time I discovered what a pain in the ass IE is when it comes to CSS handling. See for yourself.

This is how the home page looks with Chrome and, with some minor differences, in Firefox:

kode.skytreader.net in Google Chrome

My portfolio website rendered in Google Chrome.

Exactly how I intended it.

Now take a look at what happens when you give it to IE 9, which, as of this writing, is supposed to be the best stable build of IE.

kode.skytreader.net in IE9

My insides repulsively retch at this FrankenstIEn (sic) of a page.

I wasted spent countless hours experimenting with CSS so that IE may render it well. But, as you may have surmised looking at that screen shot, I ended up with my arms raised in frustrated surrender and just put up that message (which, yes, only appears for IE users) suggesting that they download either Chrome of Firefox.

It looked like that for a long time until I discovered−wait for it, drum roll please−doctypes and quirks mode.

Doctypes are, to oversimplify, comments at the beginning of HTML documents. It is like the hashbang line they always tell you to put at the beginning of your shell/Perl/Python scripts. They don’t really affect your code though they tell the executing environment (in this case, the browser) additional info about your code.

So, I put the following doctype declaration in my pages

<!DOCTYPE html PUBLIC "-//W3C//DTD XHTML 1.0 Strict//EN"
"http://www.w3.org/TR/xhtml1/DTD/xhtml1-strict.dtd">

And behold how IE renders my portfolio homepage (another drum roll please):

kode.skytreader.net in IE9, post DOCTYPE

TADAAA!!!!

Despite that it now renders as expected in IE, I chose to keep that little banner/taunt because really, world, we shouldn’t be using a browser that is as standards compliant as any 1990’s browser in the year 2012.

And I know that this isn’t the magic panacea of this wretched IllnEss. I’m sure it isn’t difficult to make IE break when your using CSS layers and positions even with quirks mode. But for sites with simple layouts, this one is definitely my life saver.

Title says it all. Glad that my UP DilNet account is still up. Wonder when will it go down? Hehe.

Keynote by Daniel Greenfeld right now. Talking about Linux/Ubuntu and robotics. And Python. Of course. (9:37am)

“People recognize the passion in you” – Daniel Greenfeld, who worked for NASA, with a degree in English Literature (9:57am)

Python walkthrough by Allan Paolo Barazon (10:05am).

Python Tricks You Can’t Live Without by Audrey Roy. What’s yours? Mine is definitely higher-order functions, map et.al. (11:06am)

Django Tutorial by Marconi Moreto. I’ve long wanted to ditch PHP for Python but never got/knew how to start. This one’s of interest. (11:40am)

After lunch sessions are about to start! For the after lunch session we have…

Mr. Sony Valdez is now talking about PyGame. My most anticipated talk! (1:13pm)

Functional Programming by Mr. Malcolm Tredinnick. I know FP from Scheme as you may have guessed from earlier (2:03pm).

(6/1/2012):

So, okay, the first day of PyCon did not end with Mr. Tredinnick’s talk on FP in Python but, after that, this post became too long to manage with my Galaxy Y. It became pure punishment to type. I wasn’t using the WordPress App for Android though; I can’t get it to work with DilNet’s proxy settings so I was doing it on my Droid’s browser.

Anyway, there’s little I’ve missed. The next talk was on Ansible Configuration Management by Mr. Rodnet Quillo. And then, Mr. Paolo Barazon returns onstage to talk about companies/websites that use Python. I know that a lot of companies/websites use Python but I didn’t know they were this many and this extensive!

Next, Mr. Tredinnick returned for a talk on uhhh…making maps with Python? I wasn’t very sure because it was in this part of the day that all of the week’s OTs caught up with me and I fell asleep. He seems to have been able to use some Python APIs to cartograph his own map. It would’ve been interesting to see if that can be merged with PyGame for full-scale games. Shame I fell asleep!

The closing talk was given by Mr. Bryan Veloso, of GitHub, on designing your own open-source project. Sometime recently (within the past year), slides from a GitHub employee became famous for two things: (1) incredible design, and (2) liberal use of swear words. Those slides, sans swearing, became my inspiration in creating the slides we used in our thesis presentations. Those slides were slides done right: eye-catching without being distracting, simple and yet complimenting the speaker in his points. I can say the same for the slides of Bryan Veloso. Maybe, it’s a GitHub thing?